Nginx学习笔记
简介
nginx(“engine x”)
- 是俄罗斯人编写的十分轻量级的http服务器
- 是一个高性能的http和反向代理服务器,同时也是IMAP/POP3/SMTP代理服务器
- 官方网站:http://nginx.org/
安装
这里基于rocky9系统版本
安装常用软件
1 | yum install -y tar wget |
下载源码包
1 | wget http://nginx.org/download/nginx-1.22.1.tar.gz |
安装编译依赖软件
1 | yum -y install gcc pcre-devel openssl-devel zlib-devel |
创建一个无法登录的用户
1 | useradd -s /sbin/nologin nginx |
编译安装
1 | ./configure --user=nginx --group=nginx --with-http_ssl_module --prefix=/usr/local/nginx |
配置文件及目录
- nginx配置文件及目录
- /usr/local/nginx/ //安装目录
- conf/nginx.conf //主配置文件
- html //网页目录
- logs //日志文件
- sbin/nginx //启动脚本
启动
- 启动nginx服务
1 | /usr/local/nginx/sbin/nginx |
- 常用选项
- -V:查看编译参数
- -c:指定配置文件,启动服务
- -t:测试配置文件语法是否有错误
平滑升级Nginx
这里升级到1.24.0版本
- 下载并解压源码包
1 | wget http://nginx.org/download/nginx-1.24.0.tar.gz |
- 编译
1 | ./configure --with-http_ssl_module |
使用新版nginx替换旧版nginx
- 备份旧版nginx
1
[root@rocky nginx-1.24.0]# mv /usr/local/nginx/sbin/nginx /usr/local/nginx/sbin/nginx.old
- 拷贝
objs/nginx到/usr/local/nginx/sbin/目录
1
cp objs/nginx /usr/local/nginx/sbin/
- 把老的已经启动过的nginx禁止换成新版本的nginx
1
2
3
4
5
6
7
8
9
10
11[root@rocky nginx-1.24.0]# make upgrade
# 需要在源码包目录下执行。注意:make命令在哪个目录执行的make upgrade命令就在哪个目录下执行
/usr/local/nginx/sbin/nginx -t
nginx: the configuration file /usr/local/nginx/conf/nginx.conf syntax is ok
nginx: configuration file /usr/local/nginx/conf/nginx.conf test is successful
kill -USR2 `cat /usr/local/nginx/logs/nginx.pid`
sleep 1
test -f /usr/local/nginx/logs/nginx.pid.oldbin
kill -QUIT `cat /usr/local/nginx/logs/nginx.pid.oldbin`
# 此时用户前面是无感知的,但是通过ps -ef|grep nginx发现进程ID已经发生改变- 查看升级完成版本
1
2
[root@rocky nginx-1.24.0]# /usr/local/nginx/sbin/nginx -v
nginx version: nginx/1.24.0
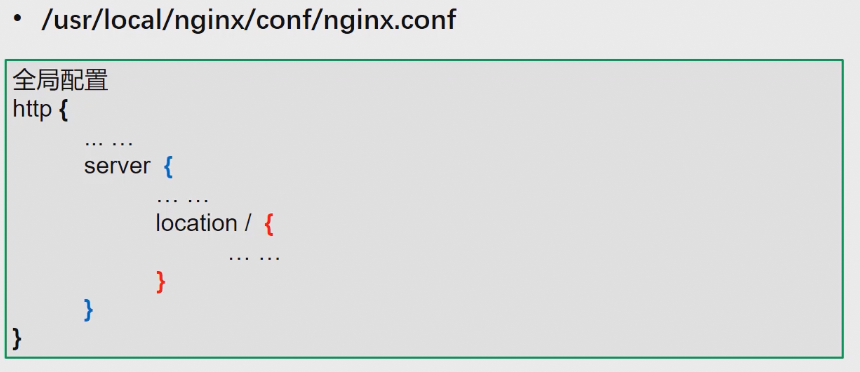
Nginx基础配置
主配置文件结构
1 | #user nobody; |
默认情况下在events和http之外的内容都可以称为全局块
第一大块是全局块
第二大块是events块
第三大块是http块
在第三大块http块中每一个server代表的是一个虚拟主机,server域中解释
1 | server { |
http块结构图
用户认证
默认nginx是所有人都可以访问,做用户认证就是希望不要让所有人打开网站,需要输入账号密码
用户认证实战
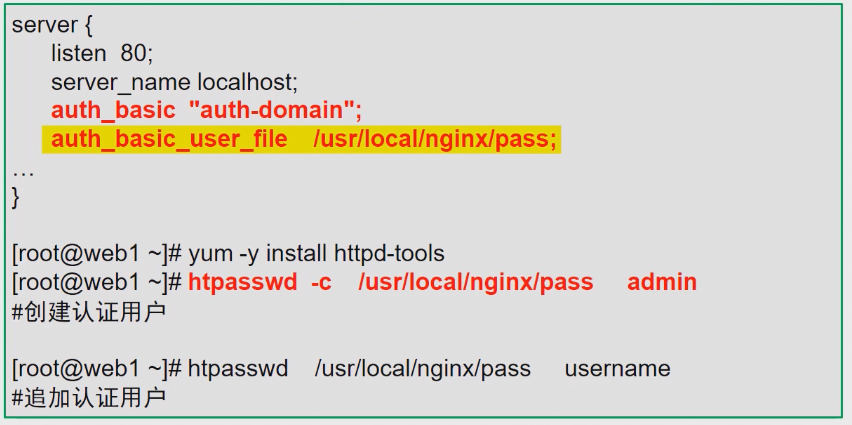
重新加载配置文件
- 因为修改了配置文件,所以需要reload重新加载配置
1 | /usr/local/nginx/sbin/nginx -s reload |
虚拟主机
基于域名
基于域名的虚拟主机
1 | server{ |
注意:基于域名的虚拟主机是通过更改server_name后面的域名来实现的
基于端口
基于端口的虚拟主机
1 | server{ |
注意:基于端口的虚拟主机是通过更改listen监听的端口来实现的
基于IP
基于IP的虚拟主机
1 | server{ |
注意:基于ip的虚拟主机是通过更改listen监听端口的前面添加IP来实现的
HTTPS网站加密
默认网站http是明文协议,https是加密协议
常见密钥算法
- 对称加密
- AES、DES # 加密和解密的方法都是同一个钥匙
- 非对称加密
- RSA、DSA # 加密和解密非同一把钥匙
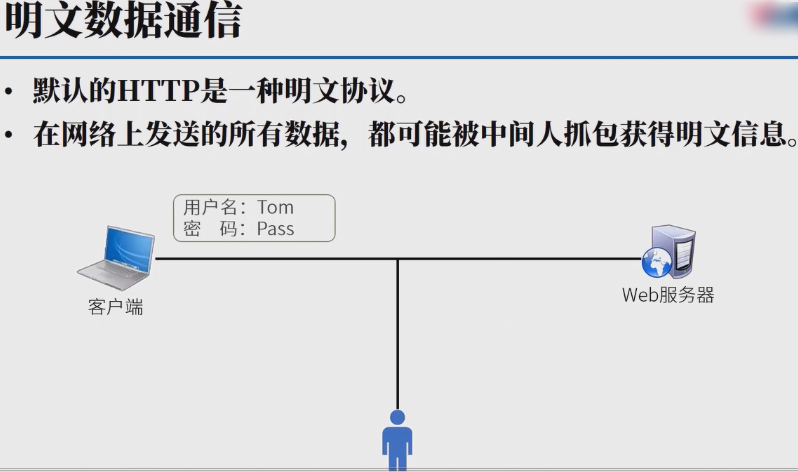
攻击者可以直接抓取到明文密码
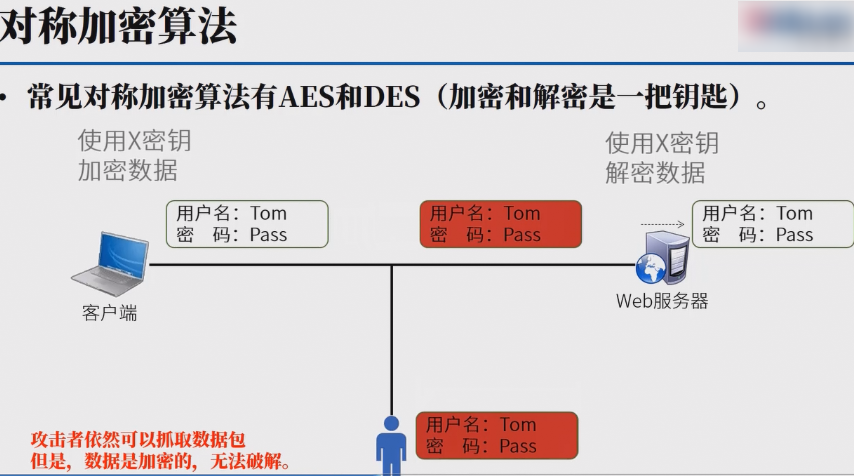
密钥不能在网络上传输,会被别人获取,就不在安全
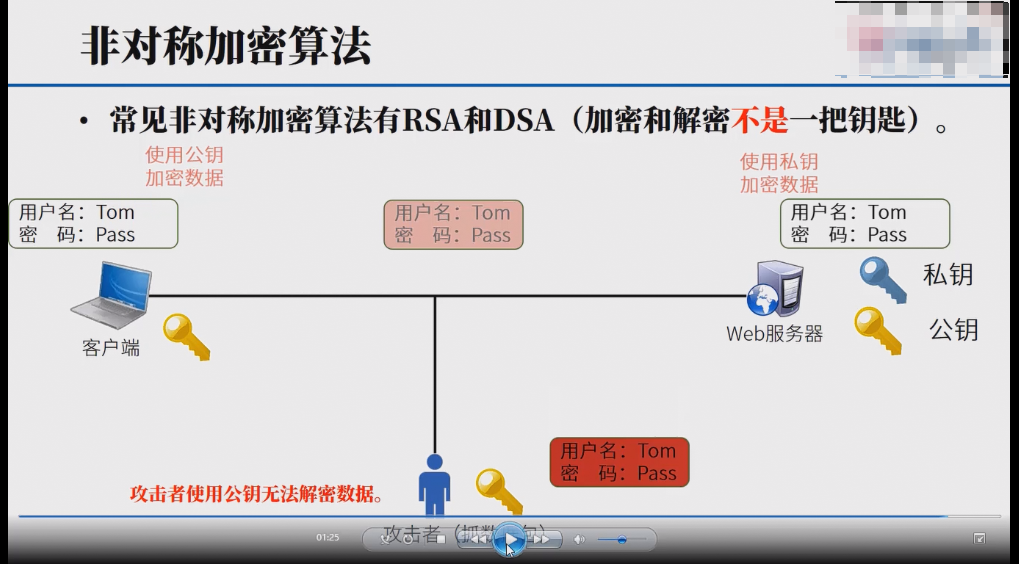
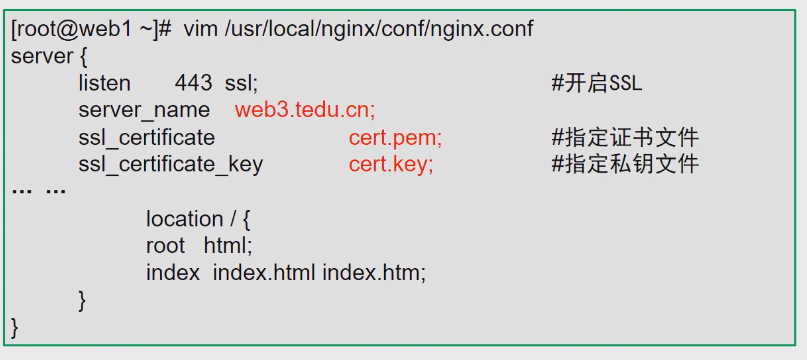
ssl虚拟主机
- SSL加密网站的核心技术是非对称生成密钥
- 公钥、私钥、证书
nginx默认会去conf目录下去找对应的公钥或私钥
1 | cd /usr/local/nginx/conf |
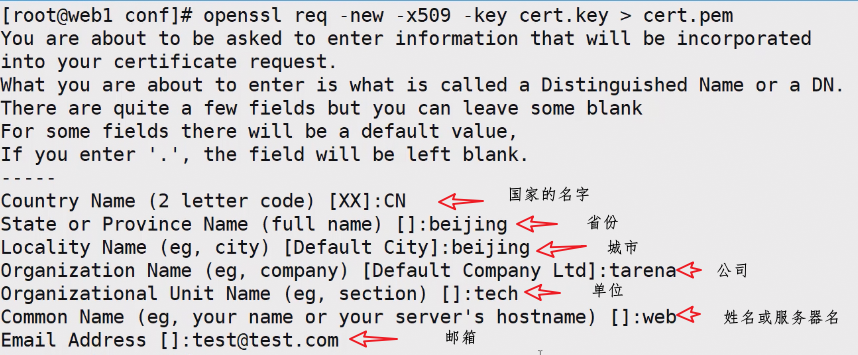
修改配置文件
地址重写
本博客所有文章除特别声明外,均采用 CC BY-NC-SA 4.0 许可协议。转载请注明来自 yyt!